You want your products in Google's Shopping tab, and everywhere you look the answer is the same: "you first need a Merchant Center account". You open it, and the interface asks for an address, a return policy, a site verification and a "feed", without saying in which order.
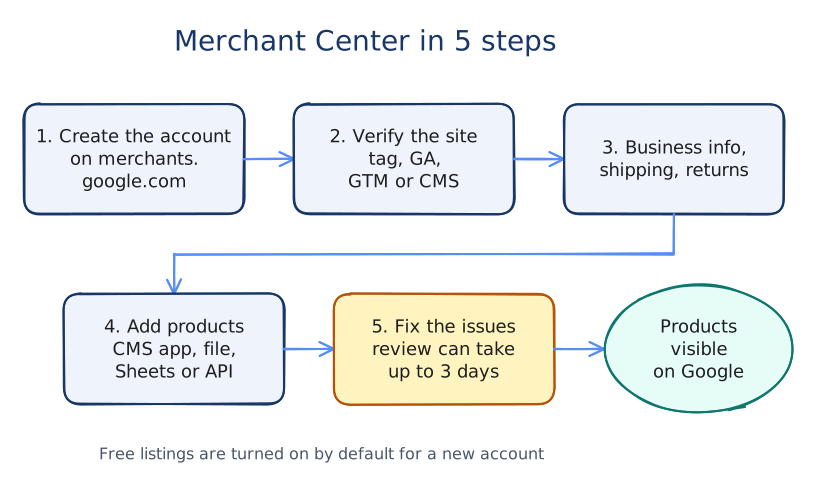
Let's go through it in order. Plan on about an hour of setup if your store runs on Shopify, WooCommerce or PrestaShop, then a few days of review on Google's side.
- Merchant Center is free, and free product listings on Google are turned on by default for a new account.
- Create the account at merchants.google.com with a Google address dedicated to the store: one address = one account.
- Verify your site and fill in the business info, shipping and returns before sending products.
- For products, use your CMS's official integration. A file or Google Sheets is only for when you don't have one.
- Google announces up to 3 days of review. Disapprovals are fixed in Products, under the "Needs attention" tab.
What you need before you start
Half of the blockers come from a piece of information you don't have at hand when you need it. Gather this before opening Merchant Center:
- A Google account tied to the store (not your personal address if someone else may have to take over the account one day).
- Admin access to your website, your CMS or Google Tag Manager, for site verification.
- The business address, a customer service email and phone number, and the URL of the page that shows them.
- Your shipping rates by country and your return policy (time limit, fees, terms page).
- Products with a GTIN (the EAN barcode) or, failing that, a manufacturer part number.
The country you choose at creation sets the account's time zone and cannot be changed afterwards. If you sell from France, choose France, even if you also target Belgium or Switzerland: other countries are set up in shipping.
Step 1: create the account
Go to merchants.google.com and sign in with the store's Google address. Merchant Center then asks you three sets of questions.
- Your business: name and business address.
- Where you sell: online, in store or both.
- Your platform: if you use Shopify or another partner CMS, say so now, it will simplify what follows.
The account is created in a few minutes. It doesn't show anything on Google yet: the site, the shipping rules and the products are still missing.
A Google address can only create one Merchant Center account. If your agency creates one for you, ask them to use an address from your company, then add the agency as a user. You stay the owner if you change provider.
Step 2: verify and claim your site
Google needs to make sure the site belongs to you before showing your products. The setting is in Settings > Business info, in the online store section. If you already have Google Analytics on the same account, verification can even happen on its own.
Otherwise, pick the method based on what you have access to:
| Method | Who it's for | Good to know |
|---|---|---|
| Via the e-commerce platform | Shopify store or connected CMS | The simplest: connecting the CMS does the work. |
| HTML tag or file | You can edit the site's code | The method that works everywhere, recommended by Google when the others fail. |
| Google Tag Manager | Site already using GTM | You need the Administrator role on the container. |
| Google Analytics | Site already tracked with GA | Admin access required. Can fail with Shopify. |
| Email verification | Address on the site's domain | A code is sent to an address linked to the site. |
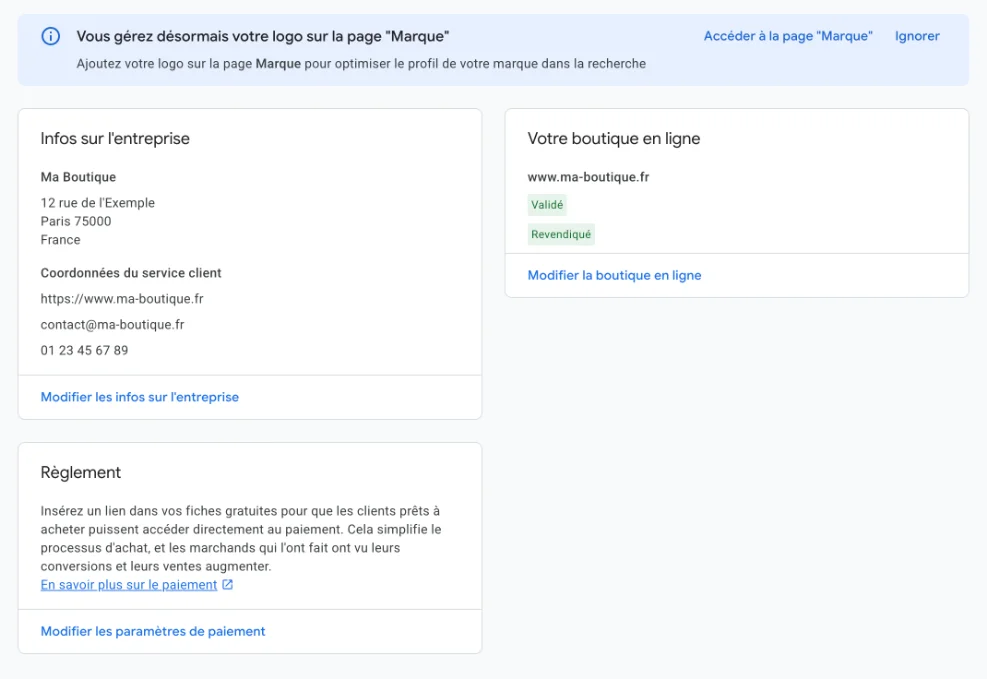
A URL can only be claimed by one Merchant Center account. If verification is stuck while everything looks right, an old account (opened by a provider, for example) may already hold the domain. If verification through Google Analytics fails, Google also suggests trying the URL without "www".
Step 3: business info, shipping and returns
This is the step people tend to rush, and it's the one that gets whole accounts disapproved. Google checks that what you declare matches what the customer sees on your site.
Business info
Short store name, full address (street, city and postal code are required), and a Customer service block with the URL of the contact page, an email and a phone number. The name must be the store's name, with no tagline or keyword.
Shipping
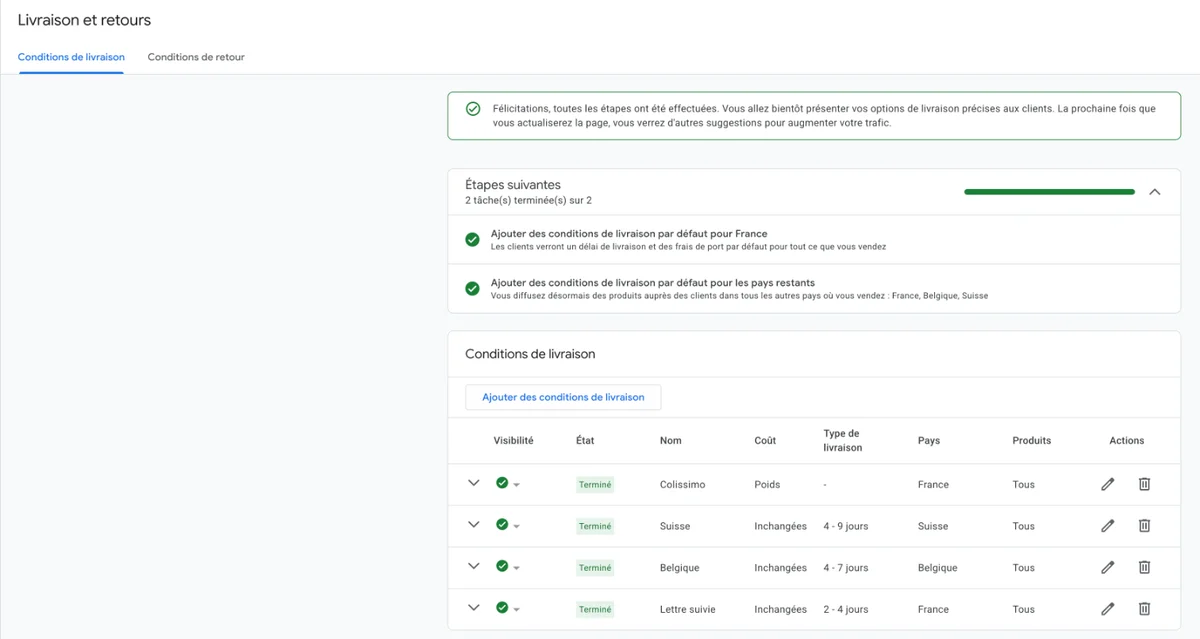
Shipping costs are required to serve ads and listings in France, Germany, Spain or the United Kingdom. Create them in Shipping and returns: one rule per country, with the rate and delivery time actually applied on your site.
A home decor store ships to France for €4.90 in 2 to 4 days, free from €60. In Merchant Center: one "France" service, rate €4.90, free shipping above €60, handling time 1 day and transit time 2 to 4 days. If the site shows "€3.90" on the day of the review, the gap is enough to get products flagged.
Returns
Return conditions are created in Shipping and returns > Return policies: time limit, any fees, link to your returns page. Google recommends them for free listings, and they reassure the buyer on the listing.
Outside the United States and Canada, Google expects prices including tax. If your CMS exports prices without tax, fix it in the integration rather than product by product.
Step 4: send your products
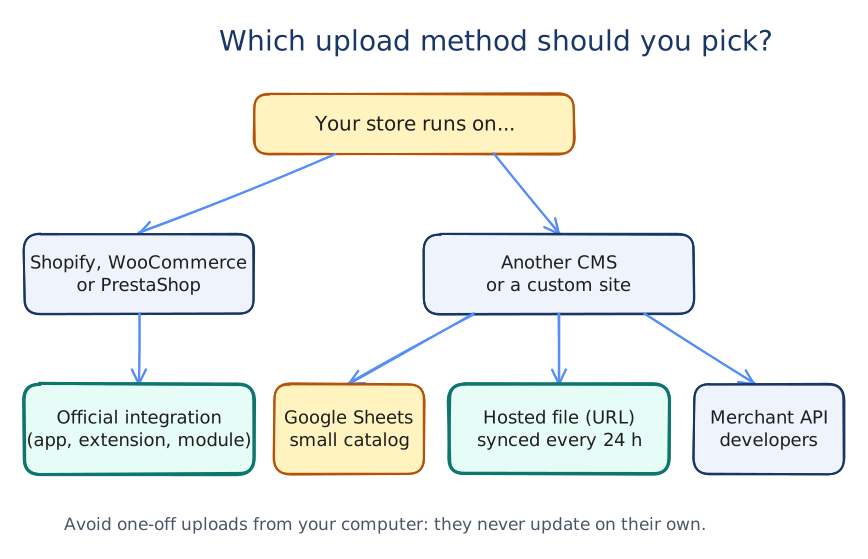
The "product feed" is simply the list of your products with their attributes (title, price, image, stock...). There are several ways to send it, and the right choice depends mostly on your CMS. Everything starts from Products > Add products.
Shopify, WooCommerce, PrestaShop: the official integration
This is the route to favor. The CMS sends the products and keeps prices and stock up to date on its own, with no file to maintain. Shopify uses the Google & YouTube app (published by Google), WooCommerce the Google for WooCommerce extension, PrestaShop a Google module installed from its back office. Each one has you sign in to your Google account, then choose which products to send.
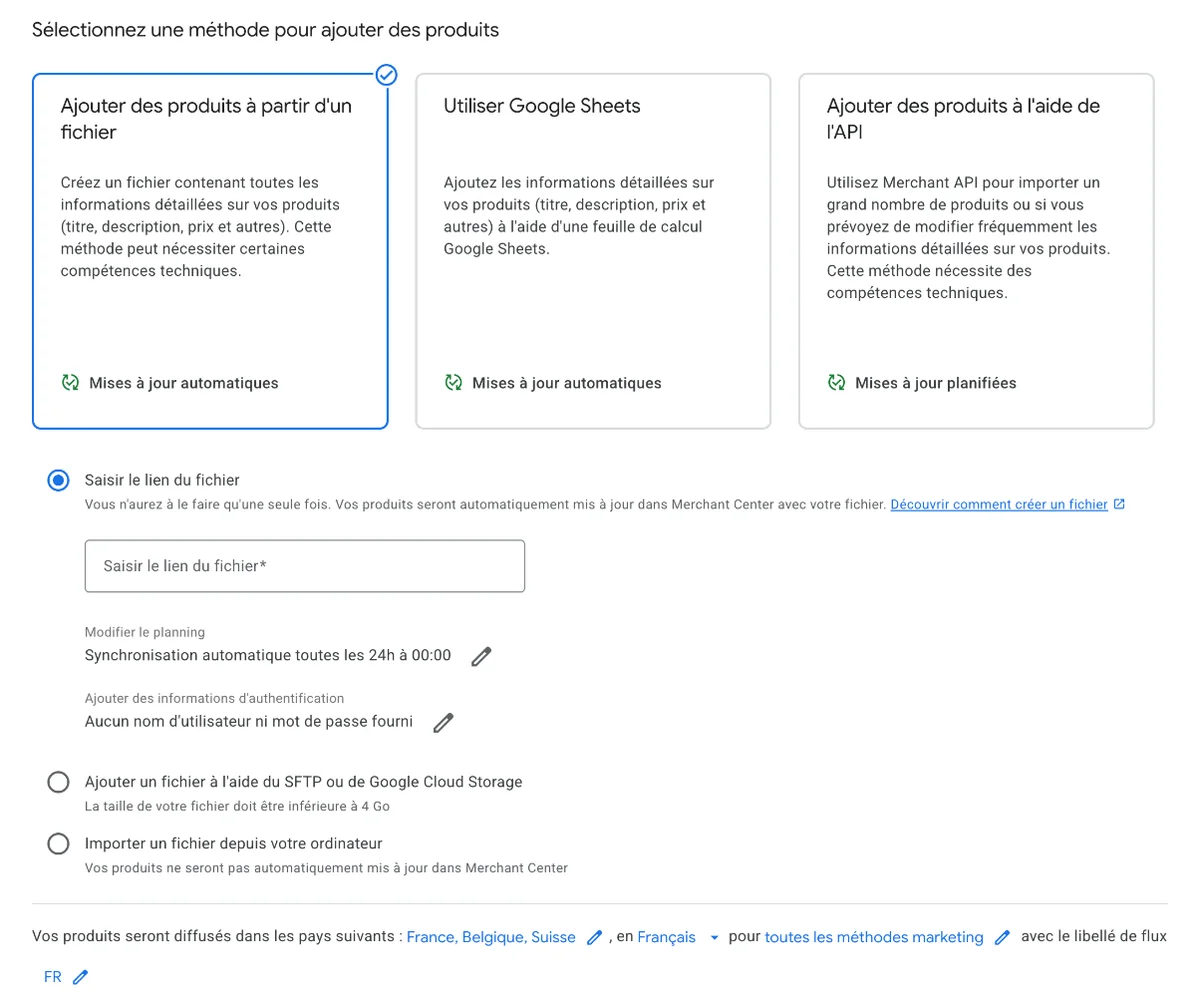
A hosted file: for other CMSs
Your platform has no integration? Export a .txt / .tsv file (tab-separated) or an .xml file (RSS 2.0 or Atom 1.0), 4 GB maximum. Better than a one-off upload: give Google the URL of the file on your server (http, https or sftp). It then fetches it automatically, every 24 hours by default, and you can change that schedule.
Google Sheets or the editor: for a small catalog
For a few dozen products, a Google Sheets file generated by Merchant Center is enough. Beyond that, updating prices and stock by hand becomes a chore that ends up pulling the feed out of sync with the site.
The API: for developers
Large catalogs or stock that changes by the minute go through the Merchant API. It replaces the Content API for Shopping, which Google now declares deprecated: if a provider offers you a new integration built on the old API, ask them about it.
The attributes Google requires
Whatever the method, every product must carry a base set of attributes. The table below sums up the ones that block serving when they're missing.
| Attribute | Required? | The rule that makes the difference |
|---|---|---|
id | Yes | 50 characters max, never changes for a given product. |
title | Yes | 150 characters max, plain text, no promotional wording. |
description | Yes | 5,000 characters max. |
link / image_link | Yes | On the verified domain. Image with no promo text or watermark. |
price / availability | Yes | Identical to the site's product page, ISO currency (EUR). |
brand | Yes (new products) | 70 characters max. |
gtin / mpn | GTIN strongly recommended, MPN if no GTIN | A wrong code leads to a disapproval. |
condition | If used or refurbished | new, refurbished or used. |
item_group_id | Yes for variants | The same for all sizes and colors of a product. |
Selling clothing in France or Germany? Add color, size, gender and age_group, which are required for that category.
The title deserves more attention than the rest, because it's what the buyer reads and what Google matches against the query. A simple structure, applied across the whole catalog:
- Put the product type at the start of the title
- One image per variant (the right color)
- The real EAN, or
mpn+brand
- "-20%" or "free shipping" in the title
- An image with a promo banner or logo
- A fake GTIN to "get past" validation
From January 31, 2027, Google will require images of at least 500 × 500 pixels. If your theme still generates smaller thumbnails in the feed, now is the time to check.
Step 5: fix disapproved products
Once the feed is sent, Google reviews each product. It announces up to three days for everything to appear. Don't worry if the counters move during that time.
The dashboard to watch is the Products page, Needs attention tab. Each issue is listed there with the number of affected products. Click one to see the details and what to do.
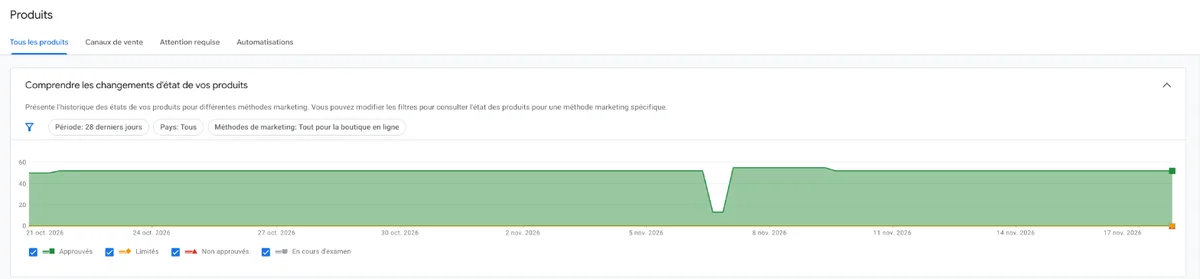
The "Needs attention" tab then details each issue. When all is well, it's empty:
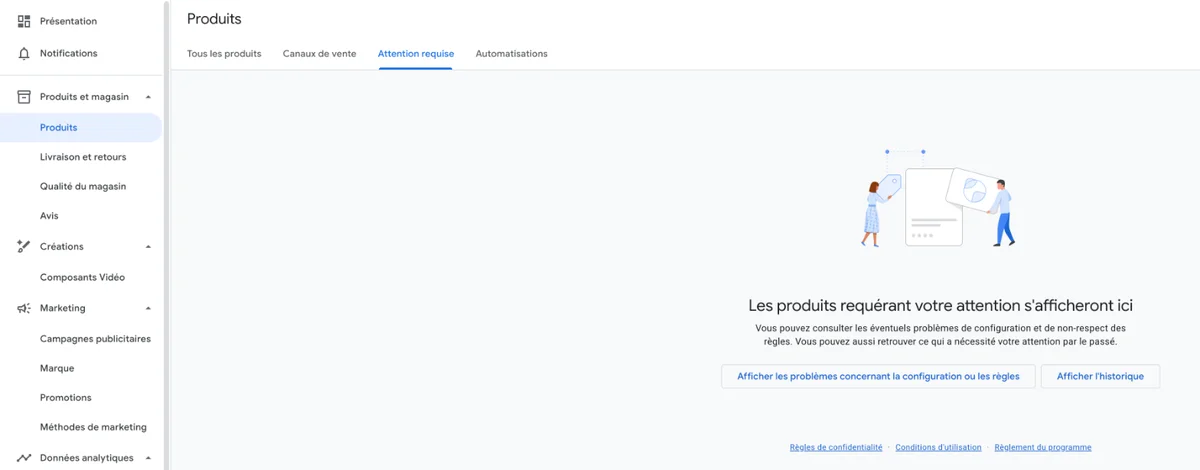
The disapprovals you'll run into most often:
- Price or stock different from the site: the feed is out of date. Merchant Center offers to "turn on automation" to fix these gaps using the product page.
- Incorrect GTIN or MPN: a made-up or mistyped code. An accurate
mpnis better than a wrong GTIN. - Promotional text in the title: move it to the attribute meant for promotions.
- Site not verified: back to step 2.
In a catalog of 1,200 products, 180 show up under "Needs attention" for a missing GTIN. That's not 180 manual fixes: if those products come from the same supplier, their file almost always contains the EANs. One import into the CMS, a resync, and the issue disappears at once.
Your products are approved? They can appear on Google for free: free listings are turned on by default, which you can check in Marketing > Marketing methods. Paid Shopping ads are managed from Google Ads.
What comes next: a feed that also works for your site
The feed you just built is often the cleanest catalog in the store: Google has checked every attribute. It isn't only useful for Shopping.
Nearly one user in two prefers the search bar to menu navigation to find a product. These are the visitors that well-filled titles, attributes and variants also help on your own site.
That's what Vectail does: it imports your catalog from Merchant Center and uses it to power your store's search, with no second catalog to maintain. Our article on the Merchant Center feed as the foundation of site search details the attributes that weigh most on results. If you also sell on marketplaces, our comparison of feed management tools will help you choose your tooling.
Your checklist
- Account created with the company's Google address, right country chosen
- Site verified and claimed
- Business and customer service info filled in, identical to the site
- One shipping rule per country, real rates and delivery times
- Return policies added
- Products sent through the CMS's official integration (or a scheduled file)
- Structured titles, correct GTIN or MPN, prices including tax
- Needs attention tab checked after 3 days
Frequently asked questions
Is Google Merchant Center free?
Yes. Creating and using a Merchant Center account costs nothing, and neither do free product listings on Google. Only Shopping ads, managed in Google Ads, are paid.
How long does it take for products to appear?
Google says it can take up to three days for all products imported from an e-commerce platform to appear. Products disapproved during the review are listed in Products, under the Needs attention tab.
Can you create several Merchant Center accounts with the same address?
No. A Google address can only create one Merchant Center account, and a website URL can only be claimed by one account. A single user can, however, be linked to up to 100 accounts.
Sources
- Baymard Institute, Ecommerce Search UX Best Practices, 2026.
Your Merchant Center account is ready? Plug your search into it
Vectail imports your catalog from Google Merchant Center and installs a search powered by Google Vertex AI on your site: results shown as you type, natural language understanding, typo tolerance. One line of code, no plugin.
Start for free - 14-day free trial, no credit card